30 Abr, 2009 15:52
Saiba como customizar sua UITableView
Entendendo a UITableView
Abaixo, algumas coisinhas que devem estar claras sobre a UITableView:
Para configurar o background da UITableView com algo mais rebuscado que não seja simplesmente uma cor, você precisa "setar" o backgroundColor da tabela para [UIColor clearColor] e usar o background da view, que está por trás dela;
O tableHeaderView (e também tableFooterView e headers e footers das seções) não precisam ser necessariamente texto, ou seja, você pode inserir a sua própria view e ter a liberdade para criar o layout que quiser;
UITableViewCell é composta por cinco diferentes subviews. Para conseguir o layout que deseja, customizar as subviews de forma correta é o grande segredo:
- backgroundView — todo o background da linha;
- selectedBackgroundView — altera o backgroundView quando a linha está selecionada;
- image — imagem (que pode ser alterada) situada à esquerda da célula;
- accessoryView — view customizada situada à direita da célula;
- contentView — view customizada situada entre image e accessoryView.
Como tudo pode ser customizado, a criatividade pode ser aflorada, porém cuidado, pois quanto mais se utilizar imagens ou efeitos como gradiente maior o consumo de memória, o que pode ocasionar problemas de performance.
Exemplo
Neste artigo que li, existe um exemplo de como customizar uma tabela do zero. Segue abaixo:
Configurando a UITableView e o layout do header
- (void)viewDidLoad {
    //
    // Change the properties of the imageView and tableView
    // (these could be set in interface builder instead).
    //
    tableView.separatorStyle = UITableViewCellSeparatorStyleNone;
    tableView.rowHeight = 100;
    tableView.backgroundColor = [UIColor clearColor];
    imageView.image = [UIImage imageNamed:@"gradientBackground.png"];

    //
    // Create a header view. Wrap it in a container to allow us
    // to position it better.
    //
    UIView *containerView =
         [[[UIView alloc]
            initWithFrame:CGRectMake(0, 0, 300, 60)]
        autorelease];
    UILabel *headerLabel =
        [[[UILabel alloc]
            initWithFrame:CGRectMake(10, 20, 300, 40)]
        autorelease];
    headerLabel.text = NSLocalizedString(@"Header for the table", @"");
    headerLabel.textColor = [UIColor whiteColor];
    headerLabel.shadowColor = [UIColor blackColor];
    headerLabel.shadowOffset = CGSizeMake(0, 1);
    headerLabel.font = [UIFont boldSystemFontOfSize:22];
    headerLabel.backgroundColor = [UIColor clearColor];
    [containerView addSubview:headerLabel];
    self.tableView.tableHeaderView = containerView;
}
Background das células
UIImage *rowBackground;
UIImage *selectionBackground;
NSInteger sectionRows =
                   [aTableView numberOfRowsInSection:[indexPath section]];
NSInteger row = [indexPath row];
if (row == 0 && row == sectionRows - 1) {
    rowBackground =
                  [UIImage imageNamed:@"topAndBottomRow.png"];
    selectionBackground =
                  [UIImage imageNamed:@"topAndBottomRowSelected.png"];
}
else if (row == 0) {
    rowBackground = [UIImage imageNamed:@"topRow.png"];
    selectionBackground =
                  [UIImage imageNamed:@"topRowSelected.png"];
}
else if (row == sectionRows - 1) {
    rowBackground = [UIImage imageNamed:@"bottomRow.png"];
    selectionBackground =
                  [UIImage imageNamed:@"bottomRowSelected.png"];
}
else {
    rowBackground = [UIImage imageNamed:@"middleRow.png"];
    selectionBackground =
                  [UIImage imageNamed:@"middleRowSelected.png"];
}
cell.backgroundView =
    [[[UIImageView alloc] initWithImage:rowBackground] autorelease];
cell.selectedBackgroundView =
    [[[UIImageView alloc] initWithImage:selectionBackground] autorelease];
Layout dentro do contentView
const CGFloat LABEL_HEIGHT = 20;
UIImage *image = [UIImage imageNamed:@"imageA.png"];

//
// Create the label for the top row of text
//
topLabel =
    [[[UILabel alloc]
        initWithFrame:
            CGRectMake(
                image.size.width + 2.0 * cell.indentationWidth,
                0.5 * (aTableView.rowHeight - 2 * LABEL_HEIGHT),
                aTableView.bounds.size.width -
                    image.size.width - 4.0 * cell.indentationWidth
                        - indicatorImage.size.width,
                LABEL_HEIGHT)]
    autorelease];
[cell.contentView addSubview:topLabel];

//
// Configure the properties for the text that are the same on every row
//
topLabel.tag = TOP_LABEL_TAG;
topLabel.backgroundColor = [UIColor clearColor];
topLabel.textColor =
           [UIColor colorWithRed:0.25 green:0.0 blue:0.0 alpha:1.0];
topLabel.highlightedTextColor =
           [UIColor colorWithRed:1.0 green:1.0 blue:0.9 alpha:1.0];
topLabel.font = [UIFont systemFontOfSize:[UIFont labelFontSize]];
Resultado e Considerações finais
Com o código acima, veja, abaixo, o resultado final. O código do exemplo está disponível no site do artigo.
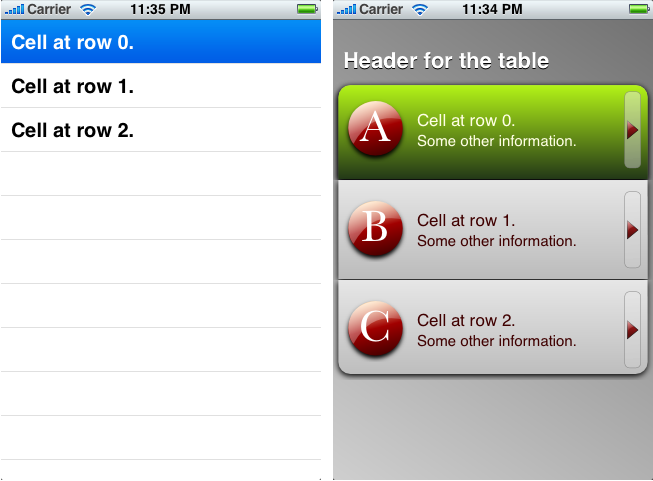
Ficou de boca aberta quando viu o resultado? Também fiquei, ainda mais porque a gente se sente meio preso com os layouts já existentes. Sabemos que as tabelas são os componentes mais usados em aplicações para iPhone e poder customizá-las do jeito que a gente quer (e o principal: não utilizando bacalhau) é muito bom.
Aproveitem para deixar as suas apps cada vez mais legais, mas não esquecendo de se preocupar com a performance!
Até :)